CIBC Investor's Edge
Get 200 free trades when you open an eligible CIBC Investor's Edge account with promo code EDGE2026.
- ✓200 free stock & ETF trades
- ✓Unlimited commission-free trades on 180+ select ETFs
- ✓Offer ends September 30, 2026
While cheque use has declined due to the rise of electronic payments, it’s still necessary for many situations.
I typically don’t write out too many cheques, but I still keep some around and know how to do it - you never know when you’ll need it.
Payment Canada keeps track of our country’s financial transactions, and they’ve found that the number of cheques written along with their value, continues to decrease. From 2019 to 2020, there was a 17% decline in paper transactions.
Even still, cheques are still a part of our financial repertoire, and you’ll probably need to write one out on occasion. Here are the simple steps for how to write a cheque in Canada:
- Write the date on the cheque.
- Write the payee’s name.
- Write the amount in numbers.
- Write the amount in words.
- Sign the cheque.
- Fill out the memo line.
Steps to Write a Cheque

1. Write the Date on the Cheque
In the above example, you can see the date is on the top right-hand corner. The rule of thumb is to date the cheque on the day you sign it.
2. Write the Payee’s Name
On the “Pay to the order of” line, write the business or individual you wish to receive payment. Make sure it is clear and spelled properly. In addition, if you want to pull funds from your own account, you could write “Cash” in the line.
However, as a caution, this isn’t the best practice since you could find yourself losing out on money if the cheque is stolen.
3. Write the Amount in Numbers
Next to the dollar sign, you’ll want to fill in the amount you wish to pay. This will get deducted from your bank account, so make sure you have enough money to cover it.
When you enter the number, put it as close to the dollar sign as possible. This safeguards against another person entering a number or two in front of it. Also, use two decimal places when writing the cents figure. For example, if your cheque amount is $405.60, make sure you enter the whole amount and not $405.6.
4. Write the Amount In Words
Although it’s not legally necessary to write out the amount in words, I highly recommend it, and here’s why. If the amount in words doesn’t match the numerical portion, the teller will defer to the words since it’s easier to fudge the amount section.
Writing it out in words is just what it sounds like - you’d write it like you’d say it, with one exception. Most times, the cents portion includes fractions at the end. If I use the example above, I’d write out “four hundred five dollars and 60/100.”
You could also write out the entire thing, including the cents - “four hundred five dollars and sixty cents.”
Some cheques already have a preprinted fraction portion on them. In that case, you’ll need to write out the dollar amount and include the cents as part of the fraction.
5. Sign the Cheque
On the bottom right-hand corner, sign the cheque. This validates it and assures the bank you agree to pay the designated amount to the payee.
6. Fill Out the Memo Line
The memo line, located in the bottom left-hand corner, lets you summarize why you’re using the cheque. A description in the memo isn’t required, but it’s a helpful tool for you to keep track of your transactions.
Still not sure how to do it? Here's a video on how to write a cheque:
https://www.youtube.com/watch?v=YX45\_hwV8ss
Why Use a Cheque?
While digital payments and electronic transfers have grown in popularity, cheques are still a standard form of payment.
Many people and businesses use cheques because not everyone accepts digital forms of payment. That’s why it’s essential to learn how to write a cheque - you’ll need to use one at some point.
But before getting into how to do that, let me explain what a cheque is. A cheque is a signed document telling a bank to release the money to the payee. Filling out a cheque properly lessens your chance of fraud and makes transactions more efficient.
So, what can you pay with a cheque? The answer is pretty much anything. Here are just a few ways you can use a cheque.
- Pay utility bills.
- Pay rent.
- Put a downpayment on a home or new vehicle.
- Pay off debt.

Tips When Writing a Cheque
Before sending out your cheques, keep these tips in mind.
- Use a pen with blue or black ink when writing out your cheque.
- Make sure you have enough money in your bank account to cover the cheques you write. Keep a tab of outstanding cheques so you know to have enough funds to cover them.
- Include the amount on the cheque in both words and numerals in case there is a discrepancy down the road.
- Keep your cheques in a secure location, and be sure to order more before you run out.
What To Do After Writing Out a Cheque
After you’ve filled everything out and signed the cheque, tear it off and make a note of it for your records. You can include the date, amount, and transaction reason in your check register, which serves as your database.
Some cheques come with stubs that stay in the book after you tear off your cheque. Other more outdated ways include cheques with carbon copies. With these types, the top copy is for your recipient, while the second lighter copy is for your records.
How Long Are Cheques Valid?
Payments Canada notes that cheques are valid for six months from the date written on the front of the document. After that, it’s standard policy to refuse to cash the cheque, but some banks will use their discretion and allow it in certain situations.
How Do I Void a Cheque?
Employers and mortgage companies often ask for a sample cheque to verify your banking information. This is typical if you’re setting up a payroll direct deposit or automatic payment withdrawals. In those situations, understanding how to void a cheque is crucial. Luckily, it’s easy to do.
All you need to do is write “VOID” in clear letters across the body of the cheque. Don’t cover any of the numbers listed on the bottom since you’re usually handing this void cheque over for verification purposes.
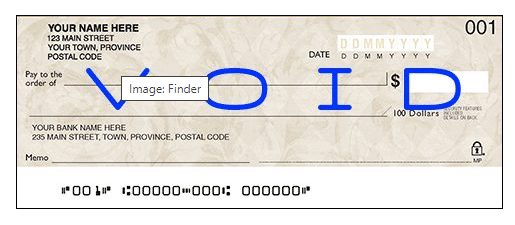
While you can manually void a cheque, you can also log into your online banking account and print one off.
How Do I Deposit a Cheque?
You can deposit your cheque at your local branch office. Hand it over to the teller, and they will verify the information on it and deposit it into your account.
You can also deposit it electronically through your bank’s mobile app. You’ll need to follow the instructions since all banks differ, but you’ll likely need to endorse the cheque and take a photo of the front and back. From there, it’ll go directly into your account after the bank verifies all the information.
What If I Make a Mistake?
Sometimes your mind wanders, and you end up writing the wrong date or misspelling the recipient’s name. While these errors can invalidate your cheque, they’re easy enough to fix.
If you made a small error, follow these steps for a quick fix.
- Draw a straight line through the mistake and correct it.
- Near the corrected information, add your initials next to it.
- If the error is large, and requires more than a simple fix, voiding the cheque is the best option.
- In those cases, write “VOID” across the entire cheque.
How Long Before a Cheque Can Clear?
How quickly you get your money depends on how much you deposited and how you did it. Canadians get instant access to the first $100 deposited.
However, if you deposited it through an ATM or your mobile app, you’ll have to wait one business day to receive all your funds.
If you deposit more than $100, the bank places a “hold on cheque.” Once again, the holding period depends on the amount and method of deposit.
-
$1,500 or less. The maximum holding period for an in-person deposit is four days. If you used an ATM or mobile deposit, five days is the norm.
-
More than $1,500. Expect a maximum holding period of seven days for in-person deposits. Mobile or ATM deposits could be as long as eight days.
What Do the Cheque Numbers Mean?

While the numbers on the bottom of a cheque look like a bunch of gibberish, they each have a meaning.
- The first set on the far left (123 in the above picture) represents the cheque number.
- The branch transit number identifies the specific branch where you opened your account.
- The financial institution number identifies the bank or financial institution.
- Finally, the last set of numbers shows your account number, which identifies your specific account.
The Bottom Line
While electronic payments are easy, knowing how to write out a cheque is still a skill necessary to get by. Hopefully, the steps above made the process simple.
Now that you know how to write a cheque, you might second guess your current financial institution and what they have to offer. If that’s the case, check out these top chequing accounts.
Best next step
Keep exploring this topic
If you want to go deeper, these are the most useful follow-up pages and tools for this topic.
Banking next step
Compare high-interest savings rates
Move from banking basics into current cash rates and safer places to park your money.
Safe cash option
See the best GIC rates in Canada
Compare guaranteed rates if you are choosing between keeping cash liquid or locking it in.
Savings tool
Estimate your TFSA room
Work out how much tax-sheltered room you still have before you move extra cash into savings.
Advertisement
7 stocks to buy and hold forever
Proven winners for income investors — blue-chip dividend stocks to hold for decades.
Get the FREE Report
Christopher Liew, CFA, CFP®
Christopher is the founder of Blueprint Financial and a CTV News personal finance columnist. As a dual-designated CFA charterholder and Certified Financial Planner (CFP®), he helps Canadians reduce financial stress through clear, customized financial plans.
View Full Profile →✅ Reviewed by Certified Financial Professionals
This content has been reviewed by CFA® charterholders and Certified Financial Planners (CFP®) with over a decade of experience in Canadian financial markets. All information is fact-checked against official Canadian sources and regulations.
Why these credentials matter: CFA® charterholders complete 900+ hours of rigorous study in investment analysis and ethics. CFP® professionals are held to the highest standards of financial planning competency and fiduciary duty in Canada.
⚠️ Professional Disclaimer
This content is for educational purposes only and should not be considered personalized financial advice. While our team brings professional expertise, individual circumstances vary. For personalized guidance, consult with a qualified financial advisor, tax professional, or mortgage specialist.